Thursday, July 28, 2011

Squidshrimpleg (or Legsquidshrimp?)


This here’s my entry for conceptart.org’s creature of the week contest.   The concept was to take a human body part and reimagine it as a creature of its own.  I didn’t quite have as much time with is as I wanted, since I’d made a previous version and dumped it because I wasn’t feeling it.  Not sure how this idea came to me exactly.  I just thought that a bent leg looked a little bit like the body of a shrimp, so I rolled with it.   As an extra, I’m also posting the lineart for this piece below so you can compare the two.  I obviously have a lot to learn about the transition between lineart and rendered artwork, but the tutorials I downloaded from TAD are really helping.

Wednesday, July 27, 2011

Urban Sketching : Pergola


This was sketched two weekends ago, while Aissa, Fer, Luigi and I were hanging out in Pergola near BF homes.  I was testing out the Dip pens (ie fountain pens but you actually dip them into bottles of ink) that I got months ago in China.  I quite like them, but I haven’t had the time to really play with them much.  Maybe I’ll use them in the Sketchcrawl later this month.

Tuesday, July 26, 2011

Regina Building, Escolta Street


Almost forgot my Tuesday post, that’s how crazy this day was, what with massive rainstorms and traffic jams and buses falling off highways.  Good thing I have a ready sketch to put up!  Had a sketchcrawl with the Urban Sketchers Philippines group last Saturday, touring Escolta street in Manila and sketched the Regina building.  On Escolta:
At the far end of Escolta is one of the most beautiful streetscapes in the city with two breathtaking pre-World War II buildings facing each other: the Regina Building and the Perez-Samanillo. The former has a neo-Classical air akin to the government buildings in New Delhi. The latter is a masterpiece of Philippine Art Deco architecture. It was designed by Juan Luna’s son, Andres Luna de San Pedro. One can detect in this splendid edifice touches of Angkor and even Meso-American motifs.

Thursday, July 21, 2011

Warhammer 40k Marine Tutorial


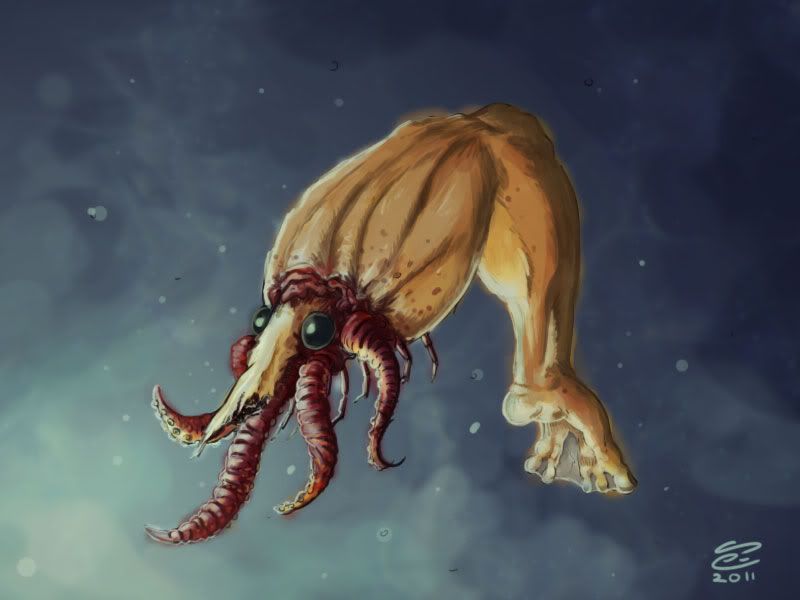
I hesitate to call this a tutorial because frankly I don’t think I’m at the point where I should be “teaching” anyone how to create artworks, but I figured that “Warhammer 40k Space Marine Step-by-Step Process” would have been a far too unwieldy title.  This wasn’t for a client, but was more of a challenge to myself that I could theoretically make the leap from pen and ink illustrations into “painted” illustrations.  There’s a pretty huge gulf between the two in terms of skillsets, though I’m of the opinion that good drawing skills are important for both.  Really good painters will have already internalized the drawing process and can just slap digital paint onto their canvas and create forms out of them, but since I’m still transitioning here’s yhe roundabout way I got to the image above.
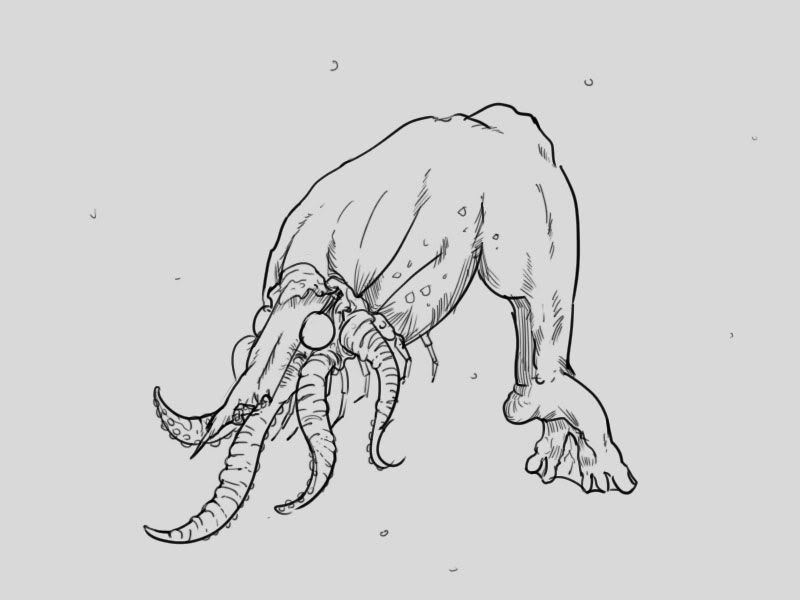
1. Thumbnails and quick sketches:  I actually made 3 or 4 sketches before settling on this one.  Unfortunately I have the tendency to delete sketches after I’m done with them.  There’s no particular reason to sketch in blue, just pick a color that isn’t black because you’ll be sketching over this.
2. A tighter sketch:  I set the blue sketch layer below to around 30% opacity so that it’s easier to sketch over.  You’ll notice that I actually changed a lot about the thumbnail sketch here.  I the original sketch the marine was standing over the ork’s body and holding out its head like a trophy.  Because I was in more of a hurry to get to the process of rendering the painted piece I changed things up so that I wouldn’t have to draw the ork body anymore.  This isn’t exactly the best move to make all the time, but you should always keep yourself open to changes, especially in the earlier steps of the process.  The later on you make these types of changes, the harder they’ll be.
3. Layingdown flats:  I lay down flat colors in a layer underneath the line art to give the image shape.  The concern here is not details but blobs of light and dark to give the image some volume.  Someone who is better at color theory than I am would lay down colored flats, but in this case I will be rendering in monochrome first before colorizing.
4.Rendering in monochrome:  Here I’ll create a layer on top of the line art (so essentially painting over the line art and the flats) and start cleaning up the rough shapes laid down with the flats.  This is probably the most time-consuming process of the whole thing, and in may ways is sort of the point of no return.  Once you get  into this it’ll be really hard to make changes so make sure you’re happy with the first three steps first.  Again I was in a bit of a hurry here, and later on I’ll be tightening things up that should have already been done in the first place, but we’ll get to that later.  Btw for painting here I’m just using a hard round brush (the basic photoshop brush) with opacity and flow set to pen pressure, and will continue to use this brush throughout the process.
5. Colorizing: I create a layer on top of the rendered monochrome layer and set layer properties to hard light.  I will use this layer to lay colors on top of the monochrome image, again using a round brush.  It’s not seen here, but I also had a “palette” layer on top of the hard light layer.  It’s important to have this because once you paint on the hard light layer you can’t simply use the eyedropper tool since your color has already changed (by virtue of “hard light” mixing it with the colurs below).  In any case it’s always good to have a palette layer as a reference for your colors.
6. Saturation: I felt that the colors were a little too unsaturated, so I duplicated the “hard light” layer, set it to “soft light” then messed around with the hue and saturation settings until I got a color that I was happy with.
7. Tightening: At this point I’m starting to get happy with the results, although there are still a lot of areas that could use tightening up (ie so that things don’t seem loose or hazy).  I create another new layer on top of everything called “tightening” and I start going over details like the skulls, the faces of the ork and the marine, etc.  I could have probably saved myself a lot of time by doing this tightening in monochrome so that I would have to be thinking about colors while I’m doing this.  We’re in the home stretch now, and the next few steps are pretty straightforward.

8. Shadows by Multiply: I create another new layer on top of verything and set the layer properties to “multiply”.  You generally do this when you want to paint over something and make it darker without necessarily affecting the rendering that’s already been done, sort of like painting shadows.  Shadows, when placed strategically, are always a good idea because they give your artwork more depth.
9. Light by color dodge: Basically what i said for “multiply”, but this time with regards to light rather than shadow.
After that, I pick a nice scrolly texture from google image to slap on behind the marine and that’s that (scroll back up to see the results)!  For reference, It took me about 8-10 hours over 3 -4 days to do this.  That’s definitely way too long for a piece that’s theoretically as simple as this.  Of course I was making a lot of mistakes along the way so I think I could eventually cut that to half the amount of time if I can keep making artworks like this.  Anyway, hope some people found this tutorial useful!

Tuesday, July 19, 2011

Doxy (Slightly NSFW)


Doxy is a Pen and Paper RPG in development by Ian Warner, who’s commissioned some black and white illustrations fro me.  Doxy is a humorous and farcical RPG, which seems to be Ian’s specialty.  While it’s not going to make me big bucks, Any illustration work I can get under my belt is always a good thing.  According to Ian doxies are meant to be common strumpets.  The modern day analogy might be to say that doxies are to courtesans what today’s prostitutes are to escorts; the more money you’re willing to pay the more class (and more importantly hygiene) you’re going to get.  I previewed the chubby doxy above in a previous post, and it’s my favorite of the first four illustrations I made for Ian.  I can’t place why exactly, I just like her curviness and her “come hither” look.
I like this one as well because of how I was able to get  a few squiggly lines and copy and paste them into a pattern for the pillows and the drapes the doxy is lounging on.  It’s a neat touch that gives the piece a lot of visual flair without necessarily taking too much time.  For more of my black and white work, please take a look at my coroflot account here, where I’ve uploaded quite a few new artworks.

Wednesday, July 13, 2011

Concept UI for a Space Shooter Game


The title of this post are the exact words I was told to use when posting this UI work on my blog.  Obviously the rest of this post will be teases and riddles so feel free to stop reading now if that kind of stuff annoys you.
About 2 weeks before our honeymoon in Japan I was contacted by a company for an opportunity to work on the UI for a franchise that I’d loved for a long time.  Maybe it’s more accurate to say it was the franchise’s blockhead kid brother, but it was still a pretty cool opportunity.  The game has been released on Facebook, and it’s a pretty simple affair, where you’re tasked with certain missions (ie shoot some stuff), pick up cargo, upgrade your ship, then proceed to the next mission.
The Social aspect of the game comes through being able to show off your best ships and comparing them with your friends’ via Facebook.  I had to remove the sample ship and components from this screen because it would make things too obvious, but hopefully you get the idea.
At this point people who know me and know pop culture in general probably have an inkling what the franchise I’m talking about is (if you do, please keep it to yourself to keep me out of trouble!).  Unfortunately even if you did figure it out and found the game that I worked on, you won’t be able to see any of this concept UI come to life.  It was never clarified to me why, but it’s easy enough to pin the blame on ridiculously tight deadlines forcing the developer to pare down their original ideas into something much simpler.  I was understandably disappointed to find this out after getting back from my honeymoon, but that’s just the way the creative industry works sometimes.

Friday, July 1, 2011

Spacechem concept art


Since we just released some DLC and Spacechem is also being offered up as one of the prizes in Steam’s Summer Camp sale, I thought this would be an opportune time to talk about some of the concept art that went into Spacechem,  Now I know what you’re thinking, Spacechem isn’t exactly a graphical masterpiece, so why would it need concept art?   Well the truth is that one of the things that drew me to spacechem originally was the story, and the opportunity to design a world and characters around that story, which was intended to have a more central role in earlier versions of Spacechem than it did in the final product.  For example, the story was going to have conversations between characters with avatars, similar to a standard JRPG.   Zach wanted an aesthetic that was different and eye-catching.  I’m not sure who suggested it, but I eventually went to early/mid twentieth century sci-fi as my peg for the universe.  Stuff like Flash Gordon, Buck Rogers, etc.  I was also influenced by a book on arms and armor in the metropolitan museum, and tried to meld that into the scifi world.  Below you can see some of my helmet designs.  None of these actually made it to the final game, but there is an echo of design #1 in of of the panels we used to help tell the story in the middle of missions.
While none of these actually made it to the final game, but there is an echo of design #1 in of of the panels we used to help tell the story in the middle of missions.  Here investigators are looking into Spacechem documents.  I wanted to make the investigators look a little more mysterious, so I enclosed their faces in helmets.
Zach also liked to say that he wanted to make the players feel heroic when they played the game, and so I designed Spacesuits for them that made Reactor Engineers look more like spacefaring heroes in the mold of Han Solo.  I took lots of inspiration from all sort of places like Star Wars and even old diving suits, but I think I borrowed most heavily from the design for Captain Harlock.
I liked design# 2 best here, and that image ultimately wound its way into the Story Panels as Bruce Novak’s signature outfit.  Below you can see him hacking at foliage in a jungle planet and entering his massive spaceship to embark on an adventure into parts unkown.
    
While a lot of the concept work behind Spacechem was left out of the game due to time and budget constraints, I think it still helped to flesh out an interesting world (which is part of what attracted me to the game in the first place) that I would love to return to some day.